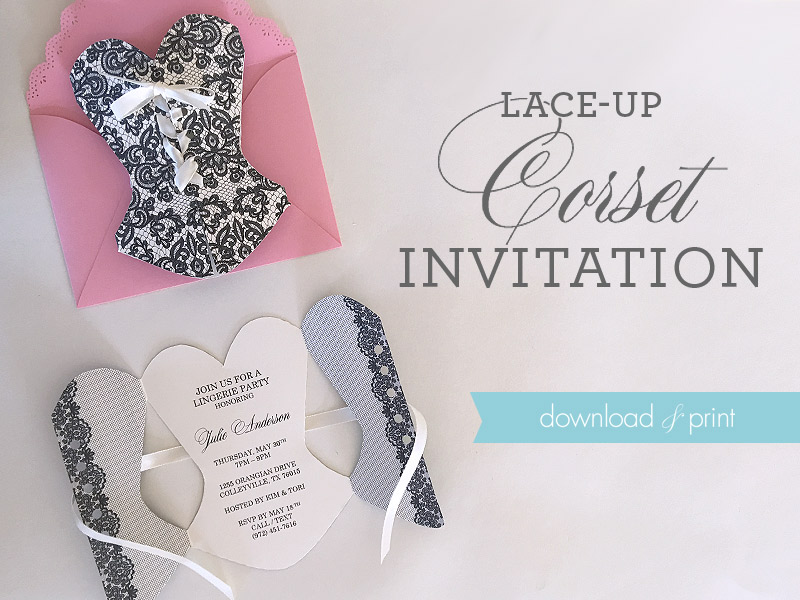
If last week's shower invitation DIY was all sugar and spice and all things nice, this week's invitation is Sassy with a capital S.
Whether you are throwing a lingerie shower for your bestie or a 40th birthday bash, this corset invitation is sure to set the mood.
Now don't look at the invitation and think this is beyond your craft skills. It's dead easy to make. The hardest part is lacing the corset, and if you can lace a shoe you can lace a corset.
The corset comes in four colors, all are included in the download. So pick the sassiest and pair it with your favorite color ribbon for an invitation that's uniquely you.
Also included in your download is a coordinating enclosure card for all the important details that don't fit in the corset. Grab the invitation download below and follow the four simple steps to create the lace-up corset for your next girls' night.
Download the corset invitation template files and save them to your computer. Open the files in MS Word and change out the placeholder text with your party details.
I've used the fonts Century Schoolbook and Maratre, which you can download for free. Or pick your own if you fancy something different.
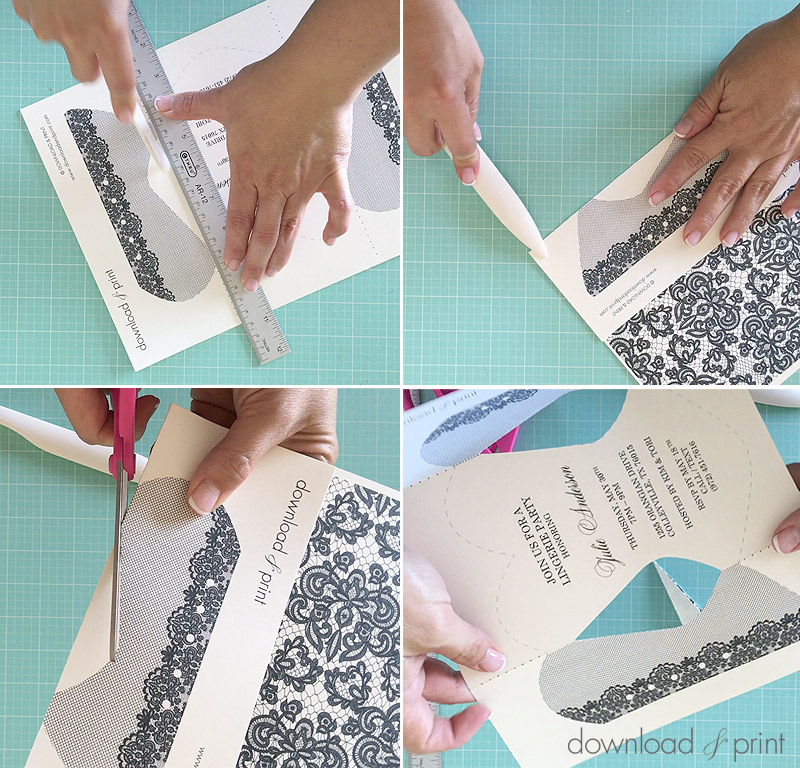
Print the lace template on card stock. Flip over the print out and place the paper back in your printer. Print the inside text on the reverse side. You now have a double sided print out.
PRO TIP: I like paper between 65 lbs and 90 lbs. This is heavier than regular copy paper, but not so thick that it will jam your printer.
Turn the paper to the text side. Score the template along the dotted fold lines using a ruler and bone folder. This starts the crease and makes for nice, crisp folds. If you don't have a bone folder on hand you can use any pointy object that won't cut through the paper, such as a closed mechanical pencil. The key is not to cut the paper!
Fold each flap backwards and sharpen the creases. The bone folder is useful here, your fingernails will thank you later.
Cut out both waist cut-outs, small detail scissors work best.
Step 3: Cut and Punch
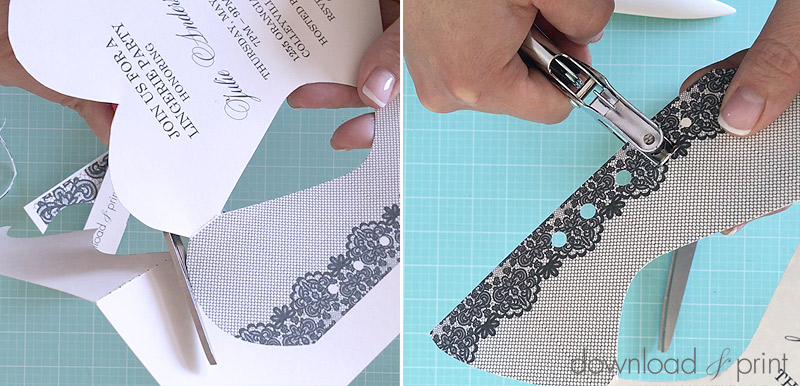
Open the template back out and cut around the outside of the corset.
Punch five holes on each corset flap, following the guides on the template. Either a 1/4" or 1/8" punch will work.
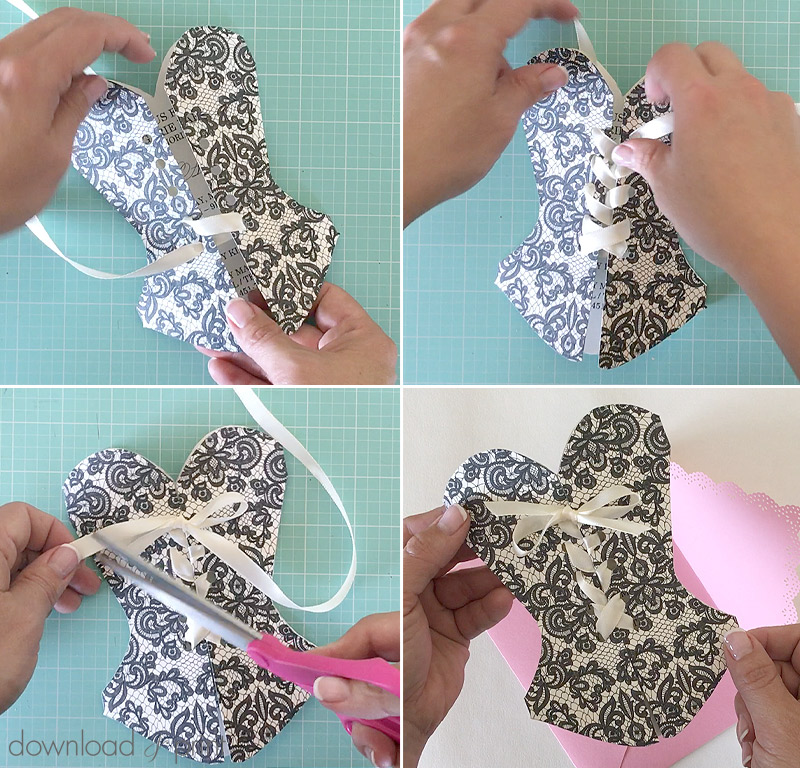
Fold the flaps closed to hide your text.
Step 4: Tie Ribbon and Finish
Cut a length of ribbon, cutting the ends on a sharp angle to create a point. Use these points to lace the corset closed, just as you would lace a shoe.
Start at the bottom and lace the ribbon up towards you, then criss-cross and finish with a bow at the top.
Trim the ribbon tails so they are in line with the bow loops.
If you are using the coordinating enclosure card, add your text to the template, print, trim along the dotted lines (you'll get four cards per sheet), and stuff into an A7 envelope along with the corset invitation.
Get the scoop on the lace envelope flap and make your envelope as sassy as the invitation!
With template love,
(Although all the products listed in this tutorial are products I personally use, I will be compensated just a tiny bit if you make a purchase through some of the links provided. Thanks for supporting small biz!)
Anna Skye
Anna Skye designs and shares invitation templates on her blog Download & Print. Her invitation templates can be used by DIY Brides and Hostesses can make their own invitations at home and save money.

 Download the corset invitation template files and save them to your computer. Open the files in MS Word and change out the placeholder text with your party details.
I've used the fonts Century Schoolbook and Maratre, which you can download for free. Or pick your own if you fancy something different.
Print the lace template on card stock. Flip over the print out and place the paper back in your printer. Print the inside text on the reverse side. You now have a double sided print out.
PRO TIP: I like paper between 65 lbs and 90 lbs. This is heavier than regular copy paper, but not so thick that it will jam your printer.
Download the corset invitation template files and save them to your computer. Open the files in MS Word and change out the placeholder text with your party details.
I've used the fonts Century Schoolbook and Maratre, which you can download for free. Or pick your own if you fancy something different.
Print the lace template on card stock. Flip over the print out and place the paper back in your printer. Print the inside text on the reverse side. You now have a double sided print out.
PRO TIP: I like paper between 65 lbs and 90 lbs. This is heavier than regular copy paper, but not so thick that it will jam your printer.
 Turn the paper to the text side. Score the template along the dotted fold lines using a ruler and bone folder. This starts the crease and makes for nice, crisp folds. If you don't have a bone folder on hand you can use any pointy object that won't cut through the paper, such as a closed mechanical pencil. The key is not to cut the paper!
Fold each flap backwards and sharpen the creases. The bone folder is useful here, your fingernails will thank you later.
Cut out both waist cut-outs, small detail scissors work best.
Turn the paper to the text side. Score the template along the dotted fold lines using a ruler and bone folder. This starts the crease and makes for nice, crisp folds. If you don't have a bone folder on hand you can use any pointy object that won't cut through the paper, such as a closed mechanical pencil. The key is not to cut the paper!
Fold each flap backwards and sharpen the creases. The bone folder is useful here, your fingernails will thank you later.
Cut out both waist cut-outs, small detail scissors work best.
 Open the template back out and cut around the outside of the corset.
Punch five holes on each corset flap, following the guides on the template. Either a 1/4" or 1/8" punch will work.
Fold the flaps closed to hide your text.
Open the template back out and cut around the outside of the corset.
Punch five holes on each corset flap, following the guides on the template. Either a 1/4" or 1/8" punch will work.
Fold the flaps closed to hide your text.
 Cut a length of ribbon, cutting the ends on a sharp angle to create a point. Use these points to lace the corset closed, just as you would lace a shoe.
Start at the bottom and lace the ribbon up towards you, then criss-cross and finish with a bow at the top.
Trim the ribbon tails so they are in line with the bow loops.
If you are using the coordinating enclosure card, add your text to the template, print, trim along the dotted lines (you'll get four cards per sheet), and stuff into an A7 envelope along with the corset invitation.
Get the scoop on the lace envelope flap and make your envelope as sassy as the invitation!
With template love,
Cut a length of ribbon, cutting the ends on a sharp angle to create a point. Use these points to lace the corset closed, just as you would lace a shoe.
Start at the bottom and lace the ribbon up towards you, then criss-cross and finish with a bow at the top.
Trim the ribbon tails so they are in line with the bow loops.
If you are using the coordinating enclosure card, add your text to the template, print, trim along the dotted lines (you'll get four cards per sheet), and stuff into an A7 envelope along with the corset invitation.
Get the scoop on the lace envelope flap and make your envelope as sassy as the invitation!
With template love,
 (Although all the products listed in this tutorial are products I personally use, I will be compensated just a tiny bit if you make a purchase through some of the links provided. Thanks for supporting small biz!)