
When I created this DIY vintage "wrought iron" wedding invitation, I had no idea it would be so wildly popular. It is the most viewed DIY at Download & Print and it's my most watched video on YouTube. The 10" doilies used in the tutorial are no longer available, so the solution is so simple, just use smaller doilies!
I didn't think 8" doilies would do this project justice, but when I finally gave them the time of day it turns out I love the look even more than their out-of-stock counterparts.
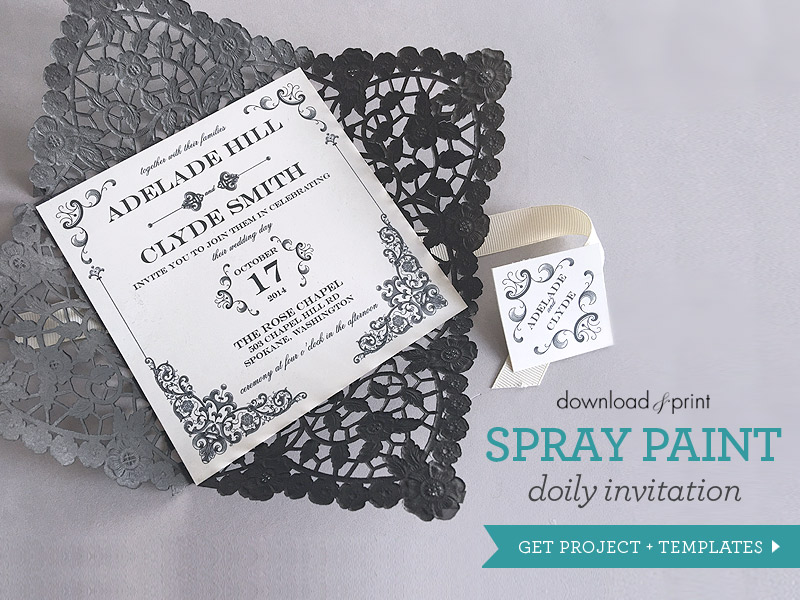
The 8" doilies show more of the lace on the front of the Iron Gate invitation, really letting the intricate details shine. These invitations are a match for the laser cut invitations you'll spend top dollar on. Picture me doing my happy dance when I tell you all you'll need to replicate the laser cut look is a paper doily, a can of spray paint and an invitation template.
It wouldn’t be a Download & Print post without a freebie. After all these years I’m still committed to providing brides with the best printables and service at the best price, and what better price is there than free? Today Download & Print readers can test drive the Iron Gate collection by downloading the FREE Invitation, RSVP and Name Badge. It’s the same high resolution designer printable as seen in the full Iron Gate collection, only Free. So you can truly try before you buy. The rest of the collection is only a couple of clicks away.
Some of you will be wondering how the doilies smell after giving them a light dusting with spray paint. Sure, they smell like paint at first. Just be sure to wait 24 hours before assembling the invitations and mailing them to give the smell a chance to wear off.
You'll definitely need an outer envelope for mailing. The doily is not robust enough to withstand the rigors of the postal service. Get yourself some 5.5" square envelopes for mailing.
I only sprayed a few doilies, but by rough calculations I think you can spray 50-60 doilies with one standard can of spray paint. If you try and I'm totally wrong, please update us all!
SUPPLIES:View the Iron Gate Collection
- 8" square paper doilies
- Spray paint
- Glue dots
- 5/8" ribbon
- White or cream paper
- Paper trimmer or scissors
- Square Invitation
- RSVP Card
- Name Badge
Step 1: customize online, save, Download, Print & trim
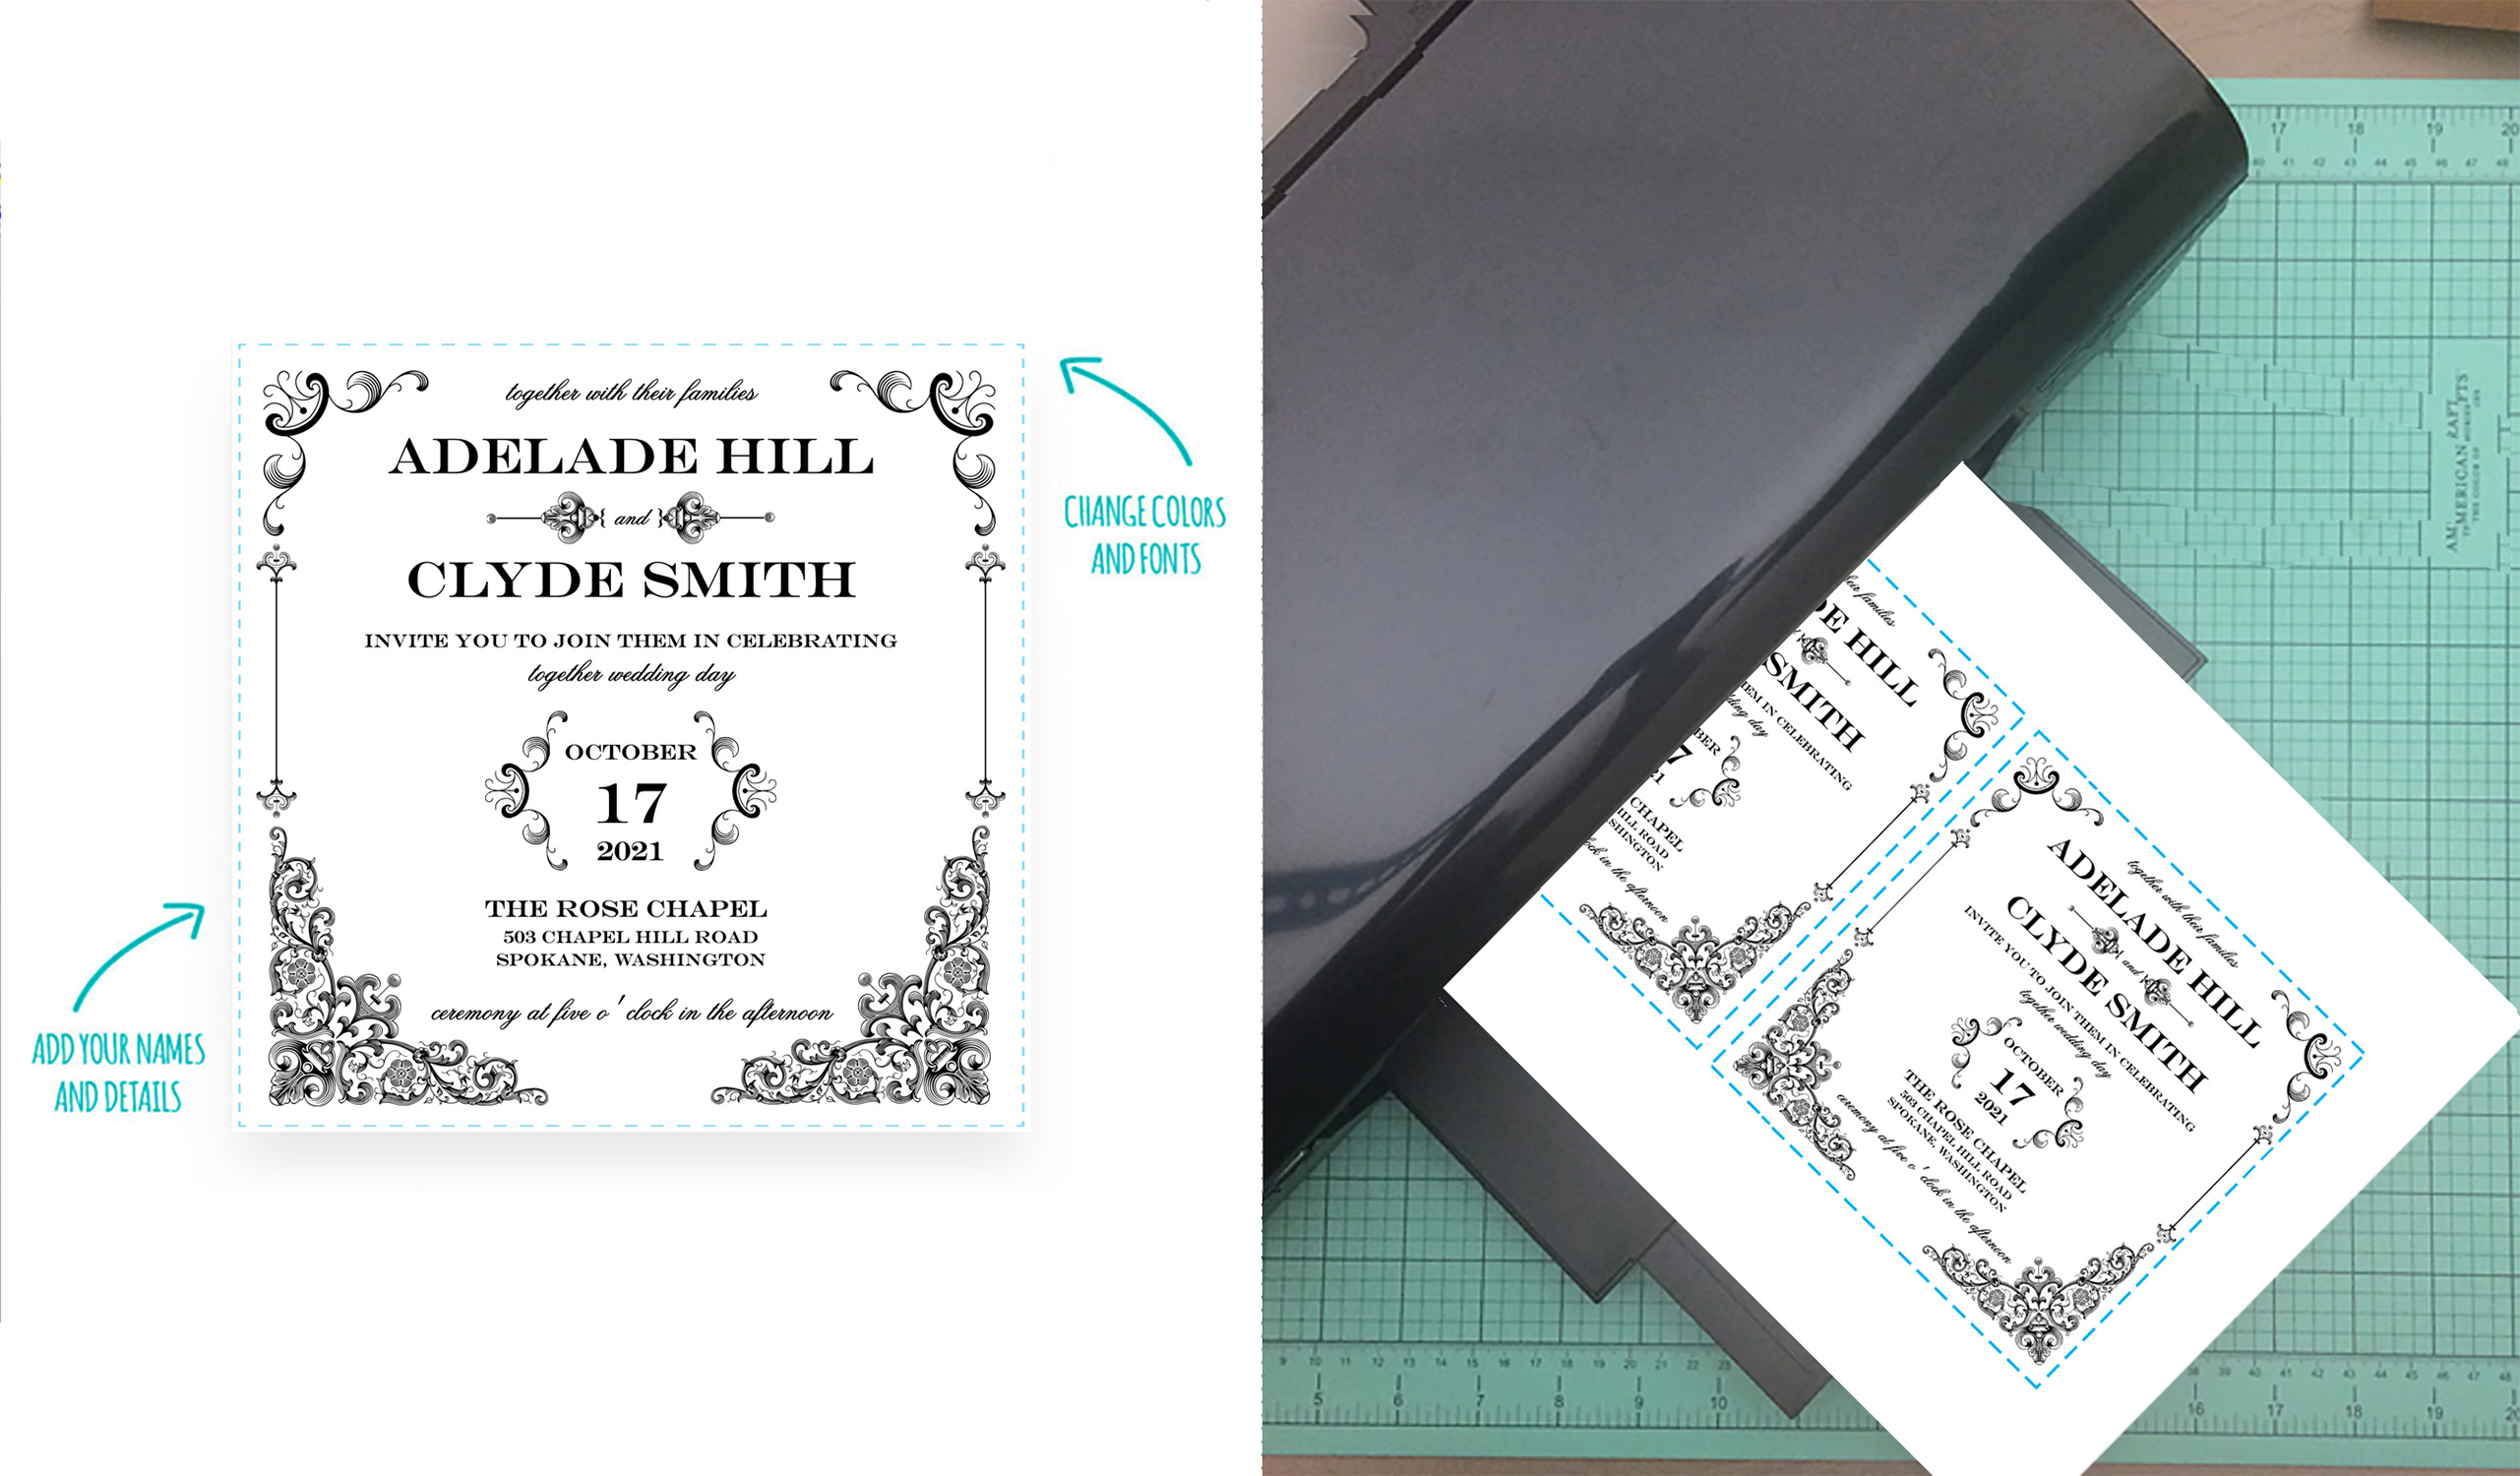
Customize online the Iron Gate invitation, RSVP and name badge as seen in this tutorial, or go the whole shebang and get the 17-piece collection that includes programs, a menu, enclosure card, thank you card, place card and more. View the entire collection here.
Save the template files and download on to your computer.
Print off one invitation and check for formatting and spelling errors. Have someone else double check for you. I promise, you'll thank me later.
When you are happy with your invitation do the full print run. I like to use paper between 65 and 90 lbs. This is heavier than standard paper but not too thick that it will jam your printer. For the most luxurious invitations use the heaviest card stock that your printer will handle. I'd go with white or off-white paper for this design.
Trim the invitation, RSVP, and name badge along the dotted lines.

Step 2: Spray Doilies
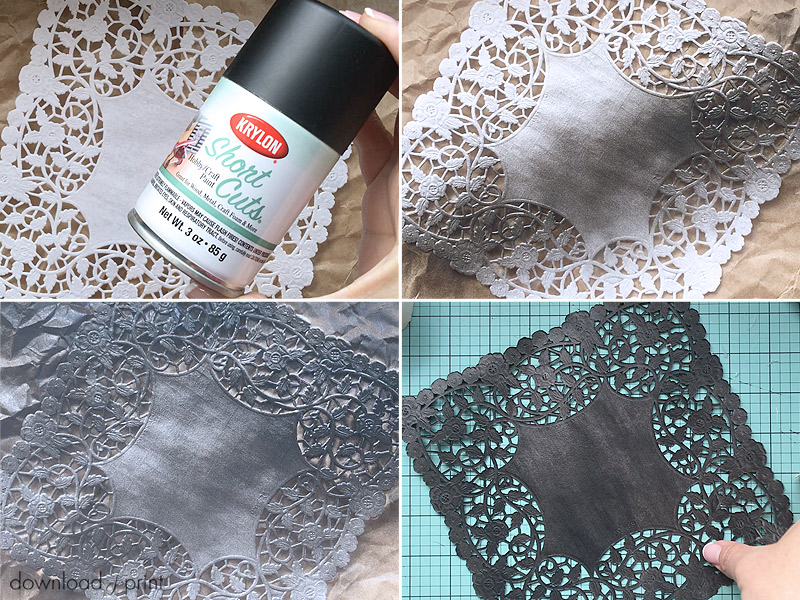
Head outside with your doilies and a can of spray paint.
Important Note: The paint needs to be suitable for paper. It should say this on the can somewhere.
I'm using black paint, I like the look of matte black, but these doilies would also look fabulous in any metallic paint, think copper, silver, oil rubbed bronze etc. Use light sprays to cover one side of each doily. By the time you have finished the first sides the doilies should be dry enough to turn over and paint the reverse side. Please do avoid smudges though (and extra touch-up work) and don't turn them over before they are dry.
Wait 24 hours before assembling your invitations. This gives the paint smell time to dissipate.
Step 3: Assemble Invitation
After 24 hours the doilies will be ready to turn into stunning invitation wrappers.
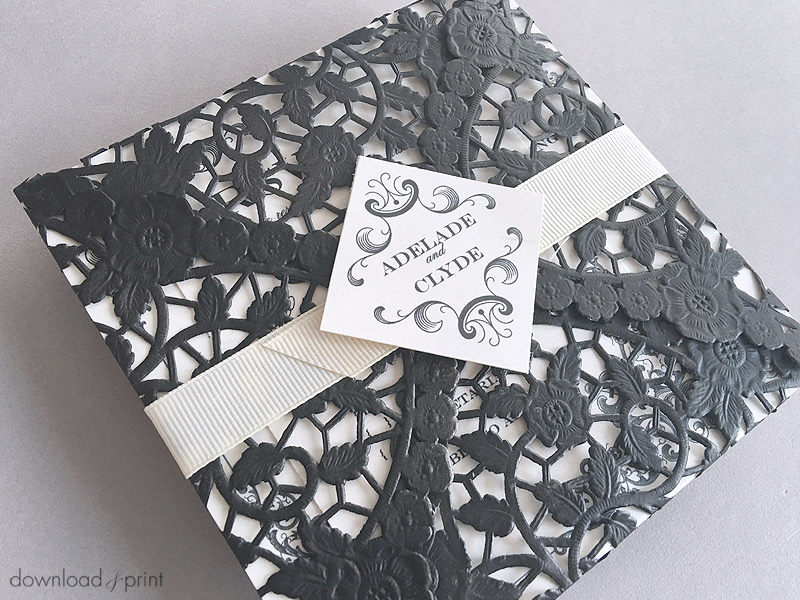
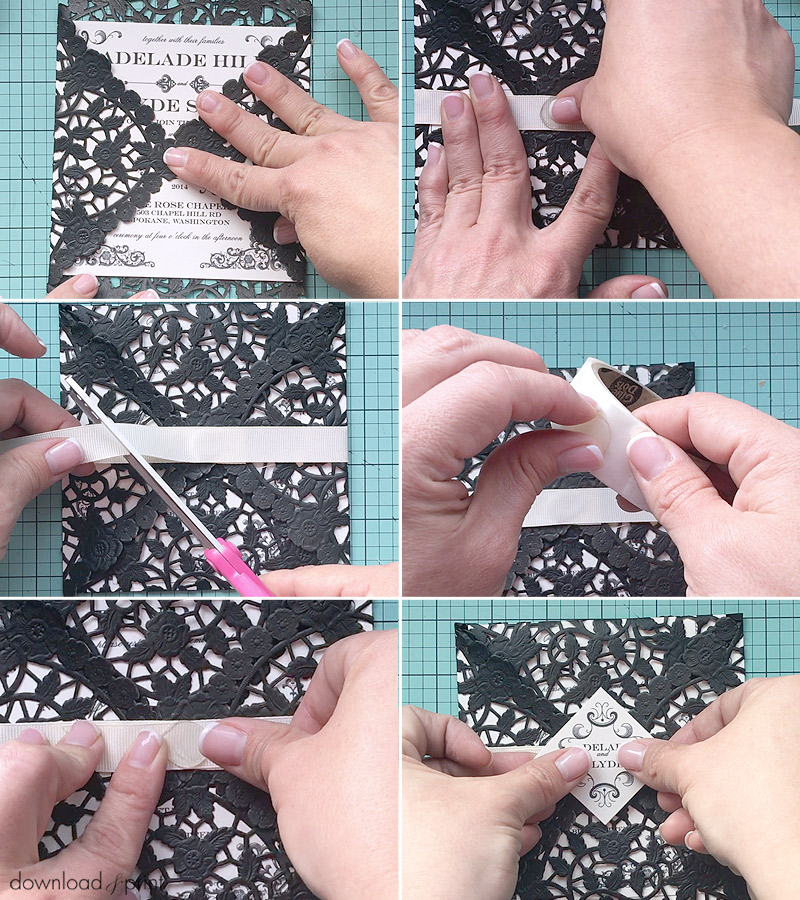
Lay down one doily and place an invitation in the center, catty corner to the doily. Sit your RSVP and enclosure card on top if you are using them.
Fold and crease each side of the doily to meet in the middle, enveloping the invitation.
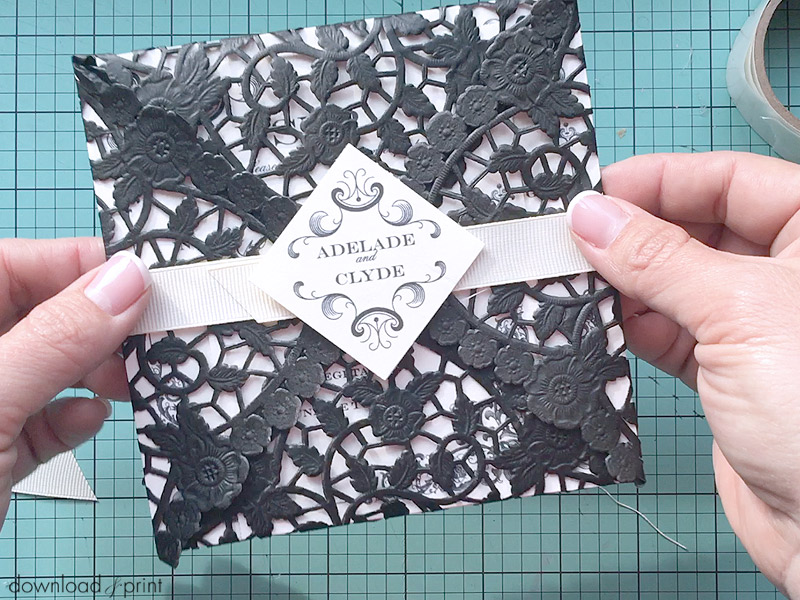
Cut a length of ribbon to wrap around the invitation. Use a glue dot to seal the ribbon closed. Trim the tails on the diagonal for a polished finish, leaving a little overlap which will be used by your guests to peel back the ribbon and reveal the invitation.
Use another glue dot to stick on the name plate.
You don't just have to take my word for it on this project, the vintage iron doily project has been tested and loved by brides worldwide. It's my first viral DIY so if you've liked or shared, or gone the full shebang and made it yourself, I thank you from the bottom of my heart.
With template love,

(Although all the products listed in this tutorial are products I personally use, I will be compensated just a tiny bit if you make a purchase through some of the links provided. Thanks for supporting small biz!)